
Again, I must start out by giving credit where credit is due: it was Brian Kooser who taught me this style of papier-mâché. (Brian likes to start with a shaped Styrofoam base though…not clay or balloons.)
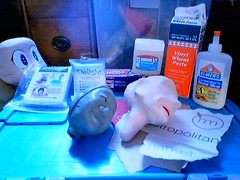
By the way, you can’t get this brand of vinyl wheat paste anymore—but there are others.
The first thing I do is get myself a whole bunch of paper grocery bags—preferably of two different colors. At Metropolitan Market you can get white bags. Next I tear off all cut edges and discard them—I also try to remove anything with glue on it (like the area where the handles are attached). I tear the pieces into approximately 5” by 5” sections.
Next, I take a flat bottomed bowl and mix maybe a teaspoon of wheat paste with water. I add water slowly until I get the paste to the consistency of gravy or hair conditioner. Then I add a generous amount of the Elmer’s Wood Glue—lately you can get brown wood glue. I use that now because if there is to be a color in the glue—I’d rather it be brown.
These days, I’m no longer using a clay head to start…instead I start with a water balloon (blown up with AIR). For two reasons really: Number one: I’m not usually making more than one copy of a head. Number two: Japanese paper clay has given me the freedom to add details after the fact and on top of the papier-mâché.
Once I have my balloon blown up to the size I want, I’m ready to begin. To start off, I take a piece of the brown paper and put it in my paste, cover the paper completely with paste, then wad it into a ball and squeeze out the excess paste. I’ll then un-wad the ball and wad it up again. This causes the fibers on the surface of the paper to stand up a little. Sort of like Velcro. When it’s placed on, the layers will grip each other better. I repeat these steps until I have three or four little waded balls ready to go.
Un-wading the first ball and tearing off quarter-sized bits of paper—not strips, I starting at the top and I work down from there. Little pieces are better than strips because you get more overlap that way which adds thickness. Once I cover the balloon completely, I hang it by its tied end on my Daiso sock drier to dry a little—be sure not to cover up the tied end!
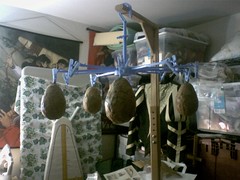
For the second layer I use the white bags so I can make sure to cover it completely. With the different color, I can easily see holes. It helps to avoid thin areas. For the third layer, I go back to the brown again. Once the third and last layer is dry, I pop and remove the balloon (it rattles around in there if you don’t). A this point, I’m ready to build out with my cardboard, masking tape and sometimes rolled up newspaper to add neck, nose, chin, or whatever else I can do in broad scope. Fine details like eyes, ears and small noses I do with paper clay. Paper clay is heavy though, so as much bulk as I can add with papier-mâché I do.
With a marionette head, I might reconsider that. A heavier head would be more desirable in that case…heavier than just papier-mâché and balloon I mean.
An example of my use of cardboard, masking tape and newspaper:


1 comment:
Thank you Elly, quite useful for me. I also work with balloons but I only use paper from newspapers, not a paste.
I don't have your recipe for making the paste, although.
Machutúa
Spain
Post a Comment