
Here’s what I’ve been doing. First I take a toilet paper roll and cut it in half and up the side. I reduce the circle of the tube down so it fits over my thumb and my last two fingers together on my right hand and tape it in place. I flatten the top and add a piece of cardboard cut in a mitten shape. I add a little bulk with masking tape. Then I papier-mâché the whole thing with my standard three layers—not going for any detail at all on the mitten part.

Once that is dry I cover the mitten part with Japanese Paper clay. In the paper clay I create the fingers…all together so they are made on the mitten but completely cover it. I add fleshy parts for the base of the thumb and the bottom of the palm. Next comes another drying period. Watching clay dry is far from stimulating so usually I work on something else for a while. You’ve got to give it a day at least. Ho hum… Now, time to paint. My first layer is gesso to prepare the surface. Then I work a very dark green into the shaded areas and details. Green? Yes, green...Dad showed me this trick. Green is the way he showed me to darken skin tone.
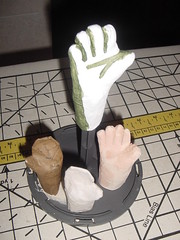
I cover that over with a medium flesh tone…depending on ethnicity of the character a medium flesh tone should be lighter than the final tone. I use the final tone last of all in the shady places and in the details and wrinkles of the hand. Keep in mind that an African character’s palms are significantly lighter on the inside. In that case I would used green plus four skin tones—two for the outside and two for the inside. Lastly I paint in nails for characters in which it is important. Of course I finish out with a matte sealer. My puppets must be a tad weather resistant. Even a matte finish sealer is going to be shiny so I use a firm bristle brush to add texture as the sealer is drying.
So there you have it. Hope you find these instructions handy.


No comments:
Post a Comment